Food for Friends

Here's the recipe… make sure you read the whole thing first!
Browsing Appetizers

Chiles en Escabeche de la Tía Cristina

June29

Chiles en EscabecheChiles en Escabeche are a Mexican staple, this recipe was assembled from some scribbles and notes while helping my aunt Cristina make a big pot of them to can for gifting.  It was a fun day in the kitchen… we made TONS and I had the “honor” of processing the onions, garlic cloves and chiles, hehehe, that’s what happens when you’re the “pinche”. These chiles are in many restaurants at the table and most people keep them at home.  You can add them to any savory dish, tortas, tacos, or just munch on the escabeche veggies as a snack.  This particular recipe has serrano chiles, and a lot of them, for a less “picante” version try seeding and deveining the chiles, or use Jalapeños.  You can also use less chiles and more veggies, a common practice because a lot of people LOVE the veggies, especially the carrots.  In some recipes they use more olive oil, or the spices and herbs are adjusted to taste depending on what you like.  Also, some recipes call for baby potatoes, quartered and blanched, that taste very very good but the starches tend to cloud the escabeche liquid.  Think of this recipe more as a set of guidelines and have fun… think green beans, bell peppers, zucchini, etc…  So yummy!

Ingredients:

  • 15-20 Chiles Serranos sliced in half lengthwise
  • 2 Onions sliced into thin half-rounds
  • 2 heads of garlic, separated and peeled (I use 3 heads some times)
  • 3 large carrots, peeled and sliced in rounds
  • 1 small cauliflower head, separated into florets
  • 2 tsp of mexican oregano (dry), or use a mix of fresh and dry
  • 1 tsp of thyme
  • 1/2 tsp of marjoram
  • 4 bay leaves
  • 5 pepper corns
  • 3 whole allspice corns
  • 2 whole cloves
  • 1 tbsp of salt (or to taste)
  • 1/4 of a cup of olive oil
  • 3 cups of vinegar
  • 1 cup of water

Process:

  1. Blanch the carrots and cauliflower in plenty of water. Drain and set aside.
  2. In an enameled or stainless steel pot heat the olive oil, sauté the onions and garlic for a few minutes, then add all the herbs and spices, sauté for another minute or so.
  3. Add the chiles, carrots and cauliflower florets into the onion/garlic mix, and salt and sauté for a few minutes.
  4. Pour the vinegar and water into the pot and let it boil for 2-3 minutes, until the vinegar releases some of its alcohol.
  5. Put the escabeche in clean jars, wait until it has completely cooled off and refrigerate (use within a month), or can into sterilized jars and keep in the pantry for up to 6 months.
  6. The escabeche is much better after a week or so.

Notes:
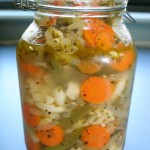
Chiles en EscabecheFor a less acidic recipe, use a bit more water and less vinegar, but I like mine with a “bite”.
Make sure you do the whole thing in a non-reactive pan because otherwise the vinegar with corrode it.
In my hometown (Ixtapan de la Sal, Mexico), they do whole jars of garlic cloves, or they use Manzano chiles, which are a bigger and slightly less picante version of habaneros (please note the ‘slightly’ part).  Lots of good memories of home…

    Soft Yummy Pretzels

    June25

    PretzelsPretzels were invented by monks in the 5th or 6th century and given as rewards for children that did their chores well. They are supposed to resemble a person with their hands in prayer.  Personally I think they look like little “hugs” and they are delicious.  This is the traditional German soft pretzel recipe, served with spicy mustard on the side and a very very cold beer.  I would make a double batch if I were you… This is the best and most sinful batch of pretzels ever concocted.  Ask Peter, he ate them all :0)

    Ingredients:

    • 1 package of active dry yeast
    • 1 cup of warm water (like 110° F)
    • 2 tbsp of vegetable oil
    • 1 tbsp sugar
    • 2 1/2 or 3 cups of all purpose flour
    • 1/3 cup baking soda
    • 6 cups of water
    • Coarse salt (I like using kosher salt)
    • Good mustard

    Process:

    Mix yeast and warm water in a big bowl or the bowl of a mixer.  Let it foam for a bit then add the oil, sugar and 1 1/2 cups of flour.  Beat until the batter is smooth and little by little add another cup of flour while you beat it with a wooden spoon or with the mixer in medium using the kneading attachment.

    If kneading by hand, turn the dough into a floured surface and knead until very smooth and satiny (about 5-7 minutes of vigorous kneading).  If using mixer, knead on medium or medium-fast for a few minutes until smooth and the dough completely detaches from the sides and is all in one nice lump.  It will stick to the paddle, and you may need to scrape it down a couple times, but after a few minutes you should have a nice dough.

    Place the dough in a greased bowl (I grease it with a little vegetable oil and I love using my wooden bowl, always the same one for rising dough).  Turn the dough to make sure it’s coated with oil on both sides and cover with plastic wrap.  Let it rise in a warm spot until it doubles in size (takes about one hour, or less if it’s really hot outside).  When it’s done rising, punch it down and knead it a few times on a floured surface to get the airbubbles out.

    Pretzel risingCut dough into 12 equal pieces for large pretzels or 18 smaller pieces for smaller pretzels (I like smaller ones personally).  Work with one lump of dough at a time and keep the rest covered with the plastic.  Roll the dough into a rope about 1/2 inch thick, shape into a pretzel and put it on a greased baking sheet.  Repeat for all the pretzels.  You will need two baking sheets at least and don’t put them too close together.

    Let the pretzels rise for another 25 minutes or so until they’re all puffed up.  You don’t need to cover them for this step.  Then, towards the end of the second rising, get the baking soda and water to a rolling boil.  Using a slotted spoon, lower the pretzels into the pot, one by one and boil for 10 seconds on each side.  Drain them a bit and put back on the baking sheet.  As they dry a little bit, sprinkle salt to taste over them.  Finally, when they’re all boiled, place in a 425°F oven for 12-15 minutes until golden brown.  Serve warm right out of the oven with a chilled beer and a bit of mustard to dip them in.

    Notes:

    Basket of PretzelsPretzels were invented by monks in the 5th or 6th century and given as rewards for children that did their chores well. They are supposed to resemble a person with their hands in prayer.  Personally I think they look like little “hugs” and they are delicious.

    You can change the topping of the pretzels and instead of coarse salt, sprinkle a mixture of sugar and cinnamon for a sweet pretzel, top with grated parmesan cheese for a cheesy pretzel or chop little bits of jalapeño chiles in the dough for a spicy pretzel.  The possibilities are endless.

    Gazpacho

    June6

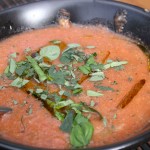
    Delicious bowl of gazpacho with herbs.Gazpacho is one of my favorite “soups” in the world.  It’s best when you make it in the Summer, when the tomatoes are delicious and very ripe. Don’t skip the step of peeling and seeding the tomatoes, that will make the final product much sweeter and delicious.  I serve it in chilled bowls, just place them in the freezer for an hour or more and they will keep the “soup” nice and chill!

    Ingredients

    • 1 1/2 pounds of tomatoes (ripe romas, vine ripened or heirloom will be good)
    • Tomato juice or clamato
    • 1 cucumber see ded and diced
    • 1 bell pepper seeded and diced
    • 1/2 onion dice d (red onion is good)
    • 1  jalapeño ch ile minced (you can seed it for less heat, not include it at all)
    • 2 garlic cloves minced
    • 1/4 cup extra-virgin olive oil
    • 1 lime, juiced
    • 1-2 tbsp of balsami c vinegar
    • Worcestershire sauce – a couple dashes to taste
    • 1/2 teaspoon toasted, ground cumin
    • 2 slices of day-old bread or about 1/2 cup of breadcrumbs
    • salt & pepper to taste
    • chopped herbs (basil, thyme, oregano, parsley, whatever you have), don’t chop until right before serving

    Process:

    Peel and seed the tomatoes.  The easy way to do this is to boil a pot of water.  With a sharp knife make an X shape on the tomato skin on the opposite side of the stem belly button.  Place them in the boiling water for 15-25 seconds depending on the size of the tomatoes.  Then put them in an ice-water bath or run them through very cold water.  They will be easy to peel then as the skin will just curl off.  Then cut them in half or quarters and squeeze the seeds out.  This is is an extra step but it will make a difference on the texture and flavor of your finished gazpacho.  I promise!

    Put the chopped veggies (onion, green pepper, cucumber and jalapeño) in a bowl and mix.

    In a blender or food processor put the tomatoes, half of the veggie mix from the previous step, tomato juice, garlic, olive oil, lime, vinegar,

    Place the tomato juice, oil, salt, garlic, Worcestershire sauce, cumin and the bread or breadcrumbs.  Puree all the ingredients into a smooth mix.  Pour this into the bowl with the other chopped vegetables.  Place in the refrigerator for at least one hour or overnight if making ahead. Before serving check for seasoning and adjust as necessary (salt, pepper, lime, vinegar, Worcestershire sauce, etc… some times I even put in a couple dashes of tabasco if the jalapeño is not doing its job).

    Serve in chilled bowls with a swirl of olive oil and the chopped herbs sprinkled on top.   Serve and enjoy!

    Here are the recipes finally. This is something I have been wanting to do for a long time and never got around to it. Some of you know that I love cooking and experimenting in the kitchen. There is a certain alchemy that has to happen in order to have the ingredients turn into delicious creations. There is no real secret behind it, just lots of fresh ingredients, time and patience to try things out and some creativity.

    Not everything I make turns out perfect on the first try. Most of the time, even when I follow recipes carefully, there are some adjustments that have to be made in order to make it exactly the way I like it. In some cases recipes have failed miserably and a last-minute plan B has been tackled, and in other cases I had to toss the first batch of something and repeat the steps until it works out.

    I hope these recipes bring a lot of magic to your meals, just as they have brought magic to mine. They have all been thoroughly tested and I will never post something I have not made myself. Some adjustments may have to be made for dietary preferences or limitations. Feel free to email me or drop me a note if you have any questions.